

FAQ
How do I Reset my Google Workspace for Education Password?
This is dependent on how your Google Workspace system is setup, the easiest way to reset your password is to contact your Google Workspace administrator (This could be someone in your school IT support team, your IT support contractor, your local authority or Academy Trust)
Alternatively, try using the “Forgot Password” option on the login page for Google.
What is 2 Step Verification and why should I use it?
Please find for information on our dedicated Two Step Authentication Page
I can't get used to Google Workspace for Education, can I continue using my Personal email for school related emails?
From May 25th 2018, ABSOLUTELY NOT!
All emails MUST be sent and received through your official school email/Google Workspace for Education to ensure compliance with the General Data Protection Regulation (GDPR)
Failure to send and receive your emails through the correct account could leave the school open to scrutiny from the Information Commissioners Office (ICO) and lead to a large fine.
How do I setup Google Classroom?
See our Classroom page for handy setup videos along with tips and tricks for getting started!
I've heard there is a new Gmail version, can I try it out?
How do you know Google’s secrets?! 
If your GSuite administrator has enabled the Early Adopter Program inside the Admin Console, YES! We encourage you to absolutely try it out!
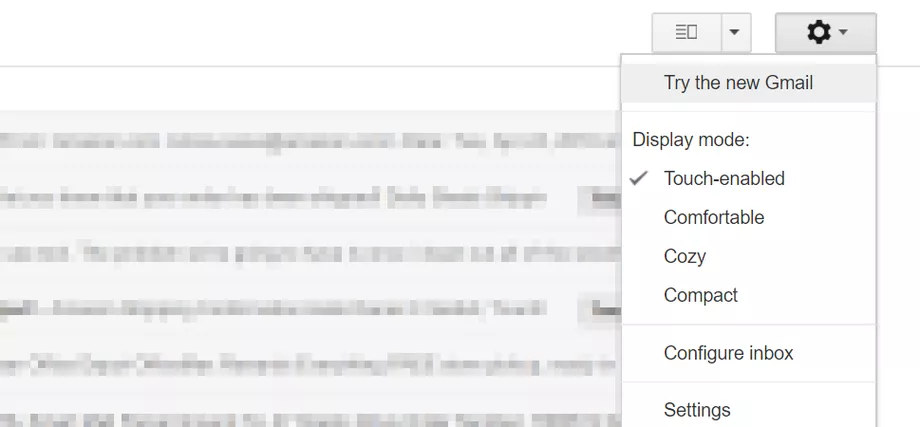
You should see a “Settings cog” in the top right of your Gmail window (Desktop version only, mobile apps and mobile site access is unaffected by this)
Click Try the new “School Name” Mail/Gmail
I preferred the old "Outlook" layout, can I change my Mail layout on Gmail?
Yes, Absolutely!
How to Set Up and Use the Gmail Preview Pane
This section provides instructions on how to install, use, and uninstall the Gmail Preview Pane tool.
Step 1. Setting Up the Gmail Preview Pane
The first step in setting up the Gmail Preview Pane is accessing Google Labs. To access Gmail Labs, start from your Gmail inbox screen and click the Settings icon in the upper left corner. A drop-down menu appears:
.jpg)
From the drop-down menu, click the Settings option. The Settings screen displays. Click the Labs option at the top of the Settings screen:
.jpg)
From the Labs tab, use the scroll bar on the right to scroll through the available labs. Scroll to the Preview Pane option. Click the Enable toggle button to the right of the lab description:
.jpg)
Scroll down to the bottom of the Labs tab and click the Save Changes button. The Gmail inbox, displays, but you’ll notice a new icon next to the Settings icon. It’s the Toggle split pane mode icon:
.jpg)
Step 2. Configuring the Gmail Preview Pane
Click the down arrow next to the Toggle split pane mode icon to display a drop-down menu:
.jpg)
Use the drop-down menu by the Toggle split pane mode icon to select how your preview pane appears. You have three choices:
- No Split – No preview pane appears.
- Vertical Spit – A preview pane for the selected message appears to the right of your inbox list.
- Horizontal Split – A preview pane for the selected message appears below your inbox list.
The example below shows an inbox configured with a horizontal split:
.jpg)
Notice that the text of the select message appears below the inbox list.
Step 3. Using the Gmail Preview Pane
Even after you’ve configured your Preview Pane in Gmail, you won’t see any message text until you select a message. Without any messages selected, your preview pane looks something like this:
.jpg)
To use preview pane feature, click on a message to select it. Once you’ve selected a message, the message text for the selected message displays in the Gmail preview pane:
.jpg)
Here’s how to check Gmail messages quickly with the Preview Pane turned on: Once you’ve selected your first message, use the up and down arrows on your keyboard to quickly select the next message in your inbox and preview the contents. There’s no need to click on each message in your inbox individually.
How to Quickly Delete a Message
You can also delete a message without opening it. This can be particularly helpful if you receive lots of junk emails or spam messages.
With the message preview feature on, you can see the contents of each selected message at a glance. You can quickly delete or archive a message without taking the time to open it.
Here’s a sample sales message that I viewed through the preview pane:
.jpg)
The preview shows me enough that I know I am not interested. I don’t have to open the message to delete it.
To delete the message, click the checkbox next to the message and click on the Trash icon:
.jpg)
The message is moved to the Trash folder. It will be permanently deleted after a specified period.
To continue browsing through your messages using the Gmail Preview Pane, click on another message to select it. Use the up and down arrows to quickly scroll through your messages.
How to Archive a Message or Move It to a Label
The process for archiving a message from within the Gmail Preview Pane is similar to the process for deleting a message.
After reviewing the selected message in the preview pane, click the checkbox next to the message:
.jpg)
At the top of the screen, click the Archive icon to archive the message. To move the message to a label (sometimes referred to as a folder) instead, click the Move to Label icon and select the label where you want to move your message.
Depending on your choice, the message is archived or moved to a label.
Return to browsing through your messages by clicking on another message to select it. Use the up and down arrows to scroll through the messages.
How to Reply to or Forward a Message
You can also reply to a message or forward a message from within the Gmail Preview Pane, which is another time-saver since it lets you answer your messages more quickly.
To reply to or forward a message, click on the Reply icon in the upper right of the preview pane. Or click the arrow next to the Reply icon and select the Reply or Forward option from the drop-down menu.
You can also click the Reply or Forward hyperlink at the bottom of the preview pane:
.jpg)
The Gmail New Message form appears below the preview text in preview pane:
.jpg)
To respond to the selected message from the preview pane in Gmail, type your response in the New Message form. When you are ready to send your reply, click the Send button at the bottom of the New Message form. Your response is sent.
Continue to use the up and down arrows to preview other messages in your inbox.
Step 4. Disabling the Gmail Preview Pane
If you change your mind about using the Gmail Preview Pane, you can easily disable it. Click on the Settings icon in the upper right corner and click the Settings option from the drop-down menu.
From the Settings screen, click the Labs option. The following tab appears:
.jpg)
At the top of the list of Gmail Labs are the labs you have enabled. The Preview Pane lab should be on this list. If you have other Gmail labs enabled, they will appear on the list as well.
To de-activate the Gmail Preview pane, click the toggle button next to the Disable option to the right of the Preview Pane lab. Scroll to the bottom of the screen and click the Save Changes button.
The system returns to your inbox. The Toggle split pane mode icon is gone. The Gmail Preview Pane feature has been disabled.
Can I configure Mail Filters, Rules and Labels?
You betcha!
Filters, Rules and Labels:
Gmail’s folder system is a bit different than that of the Outlook realm. In Gmail they’re called labels and can offer a similar type of organizational structural (with nested folders and more). Rules in Gmail are simply called filters. With the Google engine running the show, you can seamlessly make advanced searches that can automatically be filtered into specific labels.
- To create labels, take a look at this quick tutorial on Google’s support page: Using Labels
- Google also has a page listing the simple process of creating filters. Using Filters
- For more advanced searches (that can be used in filters or general searches): Advanced Search
Where is "Confidential Mode" in Gmail?
As of March 2019, this feature can be turned on by your G Suite admin… (Please keep in mind, the use of Personal email accounts for school related business can breach GDPR legislation and hold the school accountable for a data/security breach, all school business related mail should go through your official school GSuite account)

After you send an email, it’s pretty much outside your control. Gmail’s new Confidential Mode tries to give you a bit of control back by offering message expiration dates and making it trickier for email to be forwarded on.
Confidential Mode, part of the new Gmail interface, works because it doesn’t technically use standard email protocols to deliver the message. Confidential messages are hosted on Google’s servers, instead. This has its downsides—recipients who aren’t viewing the email in Gmail have to click a link to open messages in a browser, for example. Still, it’s a decent attempt at making email secure, and it’s pretty seamless when all parties are using Gmail. Here’s how it works.
Sending Confidential Emails
Google is rolling Confidential Messages out as we write this. Make sure you’re using the new Gmail and it should show up eventually. When it rolls out to you, you’ll see a new “Turn Confidential Mode On/Off” button in the toolbar at the bottom of a compose message window.

Click it and Gmail asks when you’d like the email to expire, and whether you’d like to enable SMS verification.

You just write your email, as usual. A badge lets you know you’re in Confidential Mode.

You also send your email as usual, though if you enabled the SMS feature, you might be asked for a phone number.

Note: If you don’t want to wait for the due date for a message you sent to expire, you can also open the message anytime in your Sent folder. You’ll see an option there to disable access immediately.
So that’s what sending looks like, but what will the person to whom you send a confidential message have to deal with on their end?
Receiving Confidential Emails
Receiving theses confidential emails is seamless if the recipient is a Gmail user with the new version enabled. Here’s what it looks like:

The Forward button is disabled, and there’s a banner explaining the feature. But other than that, this looks like a standard email.
When the email expires the text disappears entirely:

Not complicated, right? Sadly things are a little different if the recipient is not a Gmail user, or even if they’re a Gmail user who uses a third party email client. Instead of seeing the message, they’ll see a link like this:

They have to click this link to open the confidential message in their browser. It’s a little clumsy, but it gets the job done.
I don't understand why I need Google Drive for Desktop (Was Drive File Stream), What is it?
See our Google Drive for Desktop page.
In a nutshell, Google Drive for Desktop is: a new desktop application that allows you to quickly access all of your Google Drive files on demand, directly from your computer, meaning you use almost none of your hard drive space and spend less time waiting for files to sync.
Think of it like a virtual USB memory stick… The data does not live on your computers hard drive or a physical memory device connected to the computer… It instead synchronizes all data to your Google Drive account (Basically, it stores all of your data in Google’s secure Data Centre or “Server Farm” for us Nerds! )
Essentially, a Data Centre or “Server Farm” is a huge area/’s in multiple locations around the globe that house stacks upon stacks of servers. This is where your data is stored. See illustrated image below.

In May 2018, it replaces Drive Backup and Sync.
Does Google Workspace for Education comply with GDPR Legislation?
Yes, Absolutely!
See their statement below:
We are fully committed to the security and privacy of your data and protecting you and your school from attempts to compromise it. Our systems are among the industry’s most secure and we vigorously resist any unlawful attempt to access our customers’ data.
Google’s data centres use custom hardware running a custom hardened operating system and file system. Each of these systems has been optimised for security and performance. Because Google controls the entire hardware stack, we are able to respond quickly to any threats or weaknesses that may emerge.
Google encrypts Gmail (including attachments) and Drive data while on the move. This ensures that your messages are safe not only when they move between you and Google’s servers, but also as they move between Google’s data centres.
To ensure your organisation is compliant, Google ask your GSuite administrator to digitally agree/sign a new agreement between your organisation and Google agreeing to the new terms and data protection responsibilities about using Google as your Data Controller.